When you purchase through links on our site, we may earn an affiliate commission. This doesn’t affect our editorial independence.
Your Windows 11 PC may currently need a declutter if you’ve been using it for a while without clearing cache. You can liken this is to clearing out unwanted items in your home. Your phone, web browser or system regularly collects temporary files, also known as “Cache.” Over time, the cache files that have accumulated in your PC could cause your system to experience lagging or may take up unnecessary space.
Clearing our cache from your PC is similar to giving your PC a detox. It is simple, it’s quite effective, and capable of making your system run smoother. Cache files are often useful for a short time, but after a while, they become useless and therefore, unwanted. Unwanted cache files can occupy space and cause lagging, so you want to keep them out of your PC.
The good news is that you don’t need to be a tech expert to clear out your PC’s unwanted cache files. We’ll walk you through the steps to clear different types of cache on Windows 11.
Why Should You Clear Your Cache?
Before we dive into the how let’s talk about why it is important to regularly clear out cache files from your PC. Cache files are temporary data stored by apps and the system to facilitate system operations. But over time, they pile up and can cause problems such as:
- Slow down your PC (because it has to sift through unnecessary files).
- Take up valuable storage space (especially if you’re running low).
- Cause glitches (old cached data can sometimes conflict with new updates).
Clearing your cache won’t delete your important files. Rather, it will free up space and help your system run better.
Step-by-Step: How to Clear Out Cache on Windows 11
Step 1: Open Settings
First, you must go to your PC Settings:
- Press the Windows key on your keyboard (or click the Start button).
- Type “Settings” and hit Enter.
The Settings is the mission control spot for your computer. From here, you can tweak everything from display settings to privacy options. But right now, we’re focusing on storage.
Step 2: Go to System > Storage
Once you’re in Settings:
- Click “System” in the left-hand menu.
- Select “Storage” from the options.
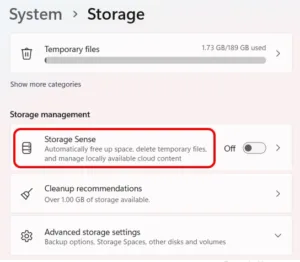
This section gives you a breakdown of files currently occupying your system’s storage. This files may include documents, apps, temporary files, and more. If you’ve ever wondered why your hard drive is full but you don’t quite know which files are occupying the hard drive, this is the section where you can find all files.

Step 3: Run Storage Sense (Optional but Helpful)

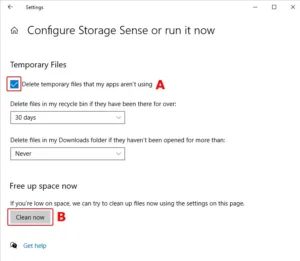
Windows 11 has a built-in cleanup tool called Storage Sense. This tool helps in automatically deleting unnecessary files. Here’s how to use it:
- Under the Storage menu, click “Configure Storage Sense or run it now.”
- Toggle Storage Sense on if you want it to run automatically.
- Click “Clean now” under “Free up space now” to do a quick cleanup.
This is like having a robot maid for your PC. It scans through and gets rid of junk files without you lifting a finger.
Step 4: Delete Cache Files Manually
If you prefer doing things yourself (or just want to see exactly what’s being deleted), follow these steps:
- Go back to the Storage menu.
- Click “Temporary files.”
- Check the boxes for the types of files you want to remove (e.g., “Cache files,” “Delivery Optimization files,” “Recycle Bin”).
- Click “Remove files.”

If you followed the steps accurately, you would have successfully cleared up cache files logged within your PC and given it a needed breather.
Bonus Tips for Keeping Your PC Cache Clean
Clearing cache is great, but can even go beyond that in terms of keeping your system primed and healthy. Here are a few extra tricks to keep your Windows 11 system running smoothly.
- Schedule regular cleanups – Set Storage Sense to run weekly or monthly so you don’t have to think about it.
- Uninstall unused apps – Head to Settings > Apps > Installed apps and ditch programs you never use.
- Clear browser cache too – If you use Chrome, Edge, or Firefox, clearing their cache separately can speed up browsing.
- Don’t overdo it – Some cache helps your system run faster, so you don’t need to delete it too often.
Check Out Our Previous Posts:
FAQs: Clearing Cache on Windows 11
Will clearing out the cache delete my valuable files?
Nope! It only removes temporary system files (cache), not your documents, photos, or important data.
How often should I clear my cache?
Every few months is usually fine—or whenever your PC feels sluggish.
Does clearing the cache speed up my computer?
Yes! It frees up storage and removes old data that might be slowing things down.
Can I recover deleted cache files?
Not really. However, you don’t need to bother about recovering deleted cache files. They’ll automatically regenerate as you use your apps.
Clearing the cache on Windows 11 may seem like a minor maintenance activity but it can make a great difference. It’s quick, it is also easy and can give your PC a significant boost in performance.
So go ahead and give your Windows 11 PC this needed cleanup maintenance. If you make it a regular habit to clear out your PC’s cache files (or let Storage Sense handle it automatically), you’ll keep your system running smoothly with increased speed and efficiency.


